When in doubt, just add glitter! Cabinet pulls and knobs are the glitter of the kitchen.
When we moved into the house, pre-kitchen renovation, the hardware on the cabinets was in pretty bad shape. The hinges were rusty and had been painted over to match the cabinets. The pulls were installed horizontally and had a really small hand hold that made it difficult to open the cabinets.
Since this is Phase 1 of the kitchen renovation we looked at a bunch of budget friendly options. I am a big believer of going to big box stores and buying mass produced items and using them in unique ways. When you have a really tight budget you can really save a lot of money by looking for standard items.


We looked at a few pulls like these but again…IKEA won out! These were 2 handles for $3.99 I think. They discontinued them this year and I can’t find the receipt but I am pretty sure.
Besides being the most cost effective and clean lined, they were large enough to make a statement on the cabinets but not overpower everything else. I didn’t want the hardware to distract from the kitchen as a whole.
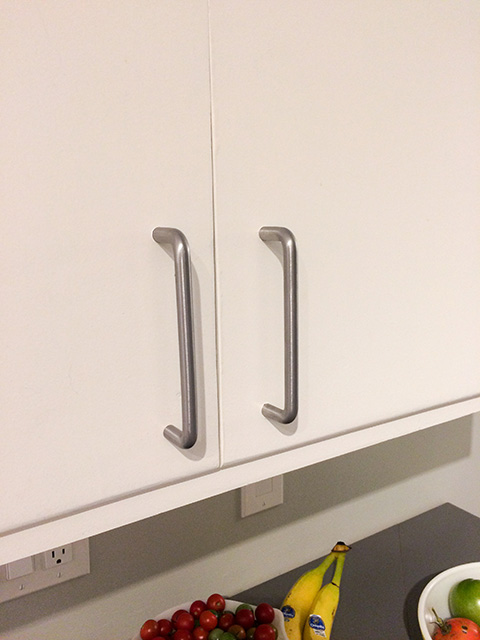
Now the installation. When we painted the cabinets we filled in the existing hardware holes and sanded them down to blend in with the cabinet doors and drawers. Since the old hardware was horizontal and the pieces too small we needed to redrill all of the holes.

We planned on using a nifty little jig that marks where the holes should go… but because IKEA is Swedish and uses the metric system the hole spacing was just a little different than the jig. Oops. So we picked a common distance from the edge of the cabinet doors and drilled new holes at those locations. It worked the best to drill from the front of the cabinet. That way if the wood splits a little, it will split on the back side of the cabinet and no one will see it because it’s on the back side that is mostly closed! I have heard that you can put blue painters tape on the back side to keep the wood front splitting as well.
Note: When you have old cabinets it is better to drill the door pulls after the doors are on the cabinets. This is the same reason you want to install the countertop before drilling the faucet holes. Once you get it secured in place the doors need to be adjusted.


We installed new hinges too. I tried to match the new hinges with the old ones but they were just different enough that it made the reinstallation of the cabinets pretty tricky. The hinges connect at 3 screws on the back that happened to be in just different enough locations than the originals. Sooooo… I had to connect the hinges at the new points. I pre-drilled some new holes on the back of the cabinets for the door side of the hinges. I tried to put the hinges in the same location as the old ones. That way I had the best chance of getting them to align with the cabinet box holes. Once we got all of the hinges on the doors we had to get them back on the cabinet boxes. We were able to reuse most of the existing holes but in a few locations we had to adjust and line up doors and drill new holes. I am glad we waited to install the door pulls until all of the doors were realigned. I didn’t want a repeat of the faucet incident.
Note: Take blue painters tape and label the cabinet doors as you go. When we were painting the cabinets and working on them it was great to know which cabinet doors were left/right and matched up since we had some cabinets that were the same size.


Along with pulls and hinges we installed new magnetic closures. These are very simple. They are a magnetic plate on the door side and a catch on the cabinet side. They installed with a few small screws. I did need to pre-drill some holes with a tiny drill bit, but it was pretty painless.

Now all of the doors close nicely with the new hinges and magnetic closures. We can actually use the pulls too because you can get your hand around them! Winner!
Before:

After!

Cost breakdown
31 pulls = 16 boxes (1 pair per box) x $3.99 = $64
Magnetic closures $1.27 x 20 =$26
45 Hinges = 10 pack $12.48 x 5 = $63
Tool list:
Drill with screwdriver & drill bits $0
Level $0
Pencil $0
Hardware jig if you use standard pulls $9
Blue painters tape $0 (We had some left over from painting)
Sharpie $0
Total: $162
Check out some of the previous kitchen posts that you missed!
DON’T HATE! LAMINATE! BUYING AND INSTALLING A LAMINATE COUNTERTOP
SANDING, REPAIRING, AND PAINTING OUR KITCHEN CABINETS
DON’T FORGET TO SIGN UP FOR AN EMAIL REMINDER! I’LL SEND YOU AN EMAIL WHEN THERE IS A NEW POST UP ON THE BLOG!

linda vlasak says
I’m almost to this point. Ikea will be my first stop. I’ve been nervous about placing/positioning accurately so I have been putting off doing this. Right now my cabinets/drawers have NO handles. Very difficult to open (especially if you have finger nails).
Thanks Ashley for making it look easy. Next week I will be at ikea picking out 26 handles 🙂
Ashley says
IKEA has some new ones that are really nice. Let me know when you are doing it and I will help you!